How I made a Sunfish Dolly
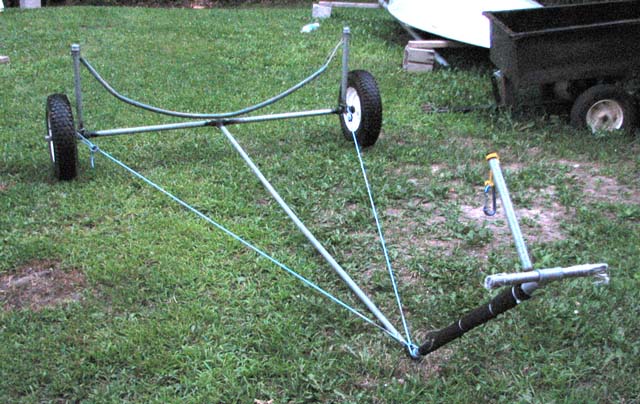
Frame:

Parts list:

  • 2 - 25"x3/4" pipe (threaded ends)
  • 2 - 15.5"x3/4" pipe (threaded ends)
  • 1 - 81.5"x1/2" pipe (threaded ends)
  • 1 - 28"x1/2" pipe (threaded ends)
  • 1 - 12"x1/2" pipe (threaded ends)
  • 2 - 5.5"x1/2" pipe nipple
  • 1 - 1.5"x1/2" pipe nipple
  • 3 - 3/4" T's
  • 1 - 3/4" male to 1/2" female reducer
  • 2 - 3/4" pipe caps
  • 1 - 1/2" 45 degree elbow
  • 2 - 1/2" T's
  • 2 - 1" pipe clamps
  • 7 feet of steel cable
  • 6 feet of garden hose (no connectors>
  • 18 feet of 1/4 line for stays
  • 2 feet (or less) of 1/8 line for key chain
  • climber's type key chain for bow handle clip
  • 2 sections (~2 feet each) of threaded rod for axels - must fit in pipe
  • 6 nuts for threaded rod
  • 4 fender washers for threaded rod
  • 2 pneumatic wheelbarrow wheels
  • 26" of 1/2" foam pipe insulation
  • Tie wraps
  • Duct tape (or something else to cover the handles)

I bought everything at Home Depot for about $100. They will cut and thread galvanized pipe to order. Don't use black pipe or it will rust quickly.

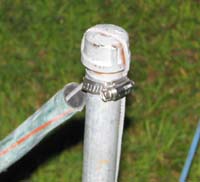
Making the axels (make two)
  1. Put a T at the end of a 25" axel pipe so that the threaded rod can go into the pipe, and tighten.
  2. Put the pipe and T into a vice with the T at the top.
  3. Put a nut on the threaded rod and slip the rod into the T and pipe.
  4. Screw the rod out of the nut so that there is enough for the wheel, two more nuts and two washers. A little extra is OK, but not too much. The remainder of the rod stays in the axel pipe and will align it while welding.
  5. Weld the nut to the opening of the T.
  6. Carefully weld the threaded rod to the nut so that it will not turn.
Final assembly
  1. Cover the 28" forward rising pipe with foam pipe insulation, and tie wrap in place. This can be done later, but if you do it now, you don't have to split the insulation open.
  2. Assemble all pipes as shown in the frame diagram, tightening every joint very well.
  3. Weld joints that should never turn...this maybe all of them, but it especially important to weld all joints on the a wheel axis, or else the uprights will not stay upright when the boat is placed on the sling.
  4. Put the wheels on: Fender washer, wheel, fender washer, nut, nut. Tighten the two outer nuts against each other to jam them.
  5. Using a grinder, groove the caps on the uprights so that the cable will stay on top when clamped.
  6. Hang the end of the cable over an upright and tighten a hose clamp over both as shown below.
  7. Put a section of garden hose over the cable fasten the other end of the cable to the other upright. The cable and hose should sag within an inch or two of the axel. When the boat is placed on the cable sling, the shape of the boat will cause it to ride much higher.
  8. Cut the excess cable with your grinder
  9. Tie the middle of the 18 foot stay line just above 45 degree elbow.
  10. Tie each end to the axel outside of the uprights using a Midshipman's or Tautline Hitch, and adjust it so that both sides are taught and the tongue is straight.
  11. Tie the 1/8 line around the threads of the "bow sprit" using a double constrictor hitch.
  12. Tie the key chain to the 1/8 line using either a double constrictor hitch or just about any loop knot. It's better to leave the one-way clip on if it will fit easily over your bow handle (I've tried it both ways).
  13. Cover the handles with some material that cushions your hands, and keeps them from getting black with oxide. I used duct tape.

Back to Sunfish
Home